
Wiping your windows doesn’t sound like such a high priority when you’re doing chores. Yet, the picture is never complete without a clean panel. No matter how much effort you put into making the room spotless, the space is never really pristine if your eyes catch the streaky glass. Figuring out how to clean windows at home – no streaks in sight – is more challenging than it originally seems. Let’s see how you can get that crystal clear look with minimal effort with the guide from our professional window cleaning team!
How to Clean Windows at Home Without Streaks (10 Simple Tips)
Some people think that streaky windows are a given and that you can’t maintain that brilliant transparency long enough. But that’s not true. It’s more than possible to keep your glass panels looking streak-free after a house clean-up, as long as you know what you’re doing. Here are 10 easy tips and tricks to make your windows look brand new:

1. Clear Your Path
Sometimes, when there’s something between us and the window, we tend to shift our swipe pattern to accommodate ourselves within the space we have. The issue here is that you need to do very defined and straightforward wipes to avoid leaving streaks behind. So, slick back the curtains and remove any furniture out of the way. Give yourself enough room to work. You’ll have better control over your tools and the window panels.
2. Dust the Glass First
More often than not, the reason behind streaked windows is there was dust on the glass before you started whipping. Unless you dust the windows before adding in any cleaning solution, you were set to fail no matter how hard you tried. Make a habit of dusting with a vacuum, brush, or dry cloth first. It’s such a simple step, but it can make all the difference!
3. Avoid Harsh Cleaners
Using ammonia-based cleaning products can be tempting. However, these might leave a residue on the glass that will collect dust and look very uneven.
If you must use a strong solution for a stubborn stain, do spot cleaning by spraying and scrubbing this specific area only.
Then, rinse it carefully and start with the entire panel with the appropriate solution. This way, you target the stain without risking creating a sticky film all over the panel.
4. Mix Your Own Cleaning Solution
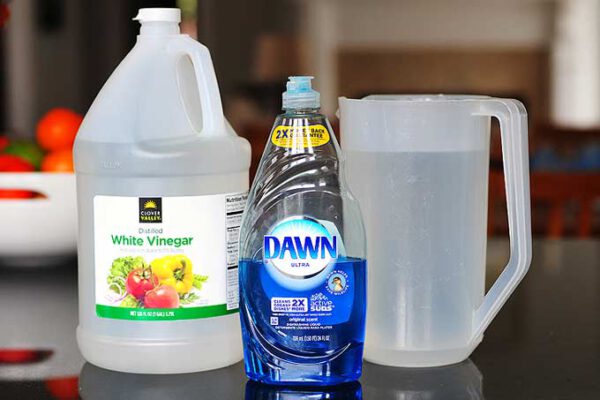
If you can’t find any gentle store-bought cleaners, try mixing your own solution at home. It’ll be more convenient and budget-friendly. Vinegar is one of the most common homemade cleaning solutions of all time, and it has antibacterial properties. You can play around with the concentration depending on your needs, but adding a 1:1 ratio of water should work fine for most purposes.
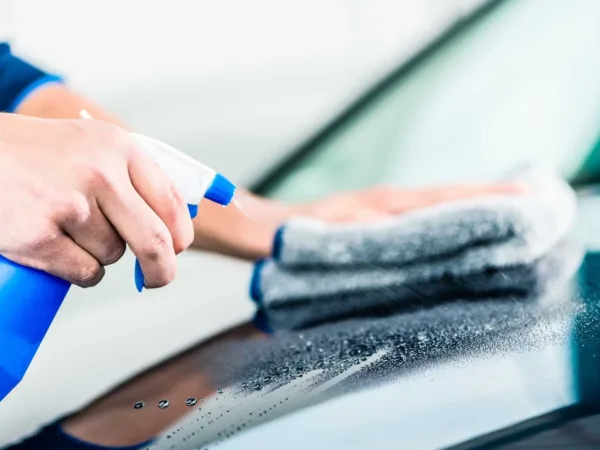
5. Spray the Cleaning Solution Evenly
The last thing you want is to stop midway and spray more of the cleaning mix. This will result in a very uneven pattern. Instead, use a spray bottle and cover the entire window panel with the cleaner, starting with the top first. If you can’t use a spray bottle, try soaking up a non-abrasive sponge and douse the glass without leaving behind any dry spots.
6. Do “Z” Swipes
Streaks are all about non-uniform whipping and residues. The residue part should be taken care of if you pick the right cleaning solution. For the wipe uniformity, try swiping in a “Z” pattern. This should guarantee that you don’t leave behind any part of the panel uncleaned. It should also direct the cleaning solution downwards with the flow of the swipe. All in all, it’s a great technique to try out.
7. Use the Right Wipe Material
Choosing the right tools can make or break your chores. So, buy cleaning wipes that are absorbent and lint-free. Microfiber ones are relatively inexpensive and easy to come across. However, if you can’t get any microfiber towels, a crumpled-up newspaper will save you in a pinch! If you’re going with a squeegee, pick one that’s slightly smaller than your panels. Remember that you want to be able to do a “Z” swipe without struggling. Ideally, a squeegee with an ergonomic rubber handle will give you an adequate grip, but you might need to practice a bit before you nail your technique.
8. Prep Before Each Panel
You might get carried away and move on from one window panel to the other without giving it a moment’s thought. If you do, you could see a decline in results from start to end. Instead, you should take a moment to prep the tools before every panel. For instance, make sure your squeegee isn’t dripping, and check your cloth to make sure it’s not oversaturated. Your cleaning solution might be turning turbid, too.
9. Dry the Windows
This step is mostly optional, but in some cases, you might need to dry up the window once you’re done cleaning it. This is particularly true for the outside face since it’s exposed to more wind. Drying it quickly will reduce the accumulation of dust and debris. However, if you choose to dry the glass, make sure you’re using a clean and lint-free cloth. After all, you don’t want to ruin all your hard work in seconds!
10. Check for Residue
Appropriate cleaning solutions made for glass won’t leave a residue film. Ending up with one anyway is an indicator that something along the way went wrong. Think of it as a quality check. If you’ve been doing everything right, from the dusting to the drying, your windows should be residue-free. If not, then you’ll have to rinse it out and wipe it all over again before the situation gets even worse.
Final Thoughts
Once you know how to clean windows at home, no streaks or sticky residues will ever bother you again. It all comes down to picking mild cleaners, going for the right tools, nailing down your swiping motion, and having some patience. With a bit of vigilance, you’ll no longer have to hide your window panels. Open up those curtains and enjoy the view through the crystal clear glass!


